HDMI micro to AV Converter Ultra Light for SONY A5000/A6000/A7R with shooter/video control

HDMI micro to AV Converter Ultra Light for SONY A5000/A6000/A7R with shooter/video control
Create a new review
3
SKU:
N/A
- True Stock of Products
- Fast & Free Shipping*
- Secure Payment
<h2 class="dtitle">
Features</h2>
<div class="text_details">
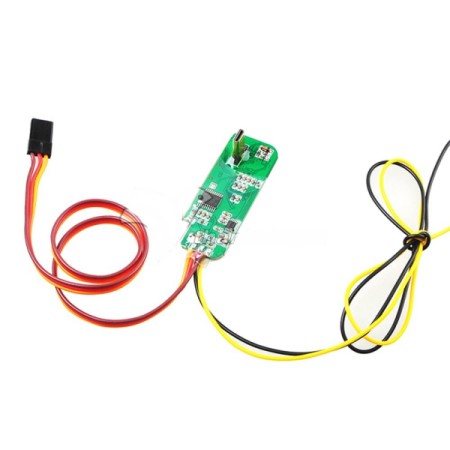
<font face="Arial" size="3">-This is the smallest HDMI micro to AV adaptor designed for SONY A5000/A6000 series. Perfect fit wiht your camera.<br>
-Ultra light, only 3.3g</font></div>
<div class="text_details">
<font face="Arial" size="3">-</font><span style="color: rgb(0, 0, 0); font-family: Arial; font-size: medium;">Can remote control camera to take photos or shooting through RC 3 sections switch</span></div>
<div id="details">
<h2 class="dtitle">
Product Details</h2>
<div class="text_details">
<p>
<font face="Arial" size="3">-Weight: 3.3g<br>
-Size: 50x15mm<br>
-Video output: PAL</font></p><p><br></p><p><span style="color: rgb(0, 0, 0); font-family: Arial; font-size: medium; line-height: normal;">Remote control method with 3-position switches:</span><br style="color: rgb(0, 0, 0); font-family: Arial; font-size: medium; line-height: normal;"><span style="color: rgb(0, 0, 0); font-family: Arial; font-size: medium; line-height: normal;">Position 1 (upper position) : take photo</span><br style="color: rgb(0, 0, 0); font-family: Arial; font-size: medium; line-height: normal;"><span style="color: rgb(0, 0, 0); font-family: Arial; font-size: medium; line-height: normal;">Position 2 (middle position): stop </span><br style="color: rgb(0, 0, 0); font-family: Arial; font-size: medium; line-height: normal;"><span style="color: rgb(0, 0, 0); font-family: Arial; font-size: medium; line-height: normal;">Position 3 (lower position): video recording</span><br style="color: rgb(0, 0, 0); font-family: Arial; font-size: medium; line-height: normal;"><span style="color: rgb(0, 0, 0); font-family: Arial; font-size: medium; line-height: normal;">* Special hints:</span><br style="color: rgb(0, 0, 0); font-family: Arial; font-size: medium; line-height: normal;"><span style="color: rgb(0, 0, 0); font-family: Arial; font-size: medium; line-height: normal;">1.Before the device is powered on (including switch on camera or switch on the receiver), the 3-position switch of your transmitter must be set to "Stop" position (middle position), this is very critical for the device to work properly. </span><br style="color: rgb(0, 0, 0); font-family: Arial; font-size: medium; line-height: normal;"><span style="color: rgb(0, 0, 0); font-family: Arial; font-size: medium; line-height: normal;">2. When switching from "video recording" to "stop" or from "stop" position to "video recording", you must wait for at least 5 seconds, so as the camera can have enough time to response to the status change. Switching too fast may cause malfunction of your camera or even damage the video file.</span><br style="color: rgb(0, 0, 0); font-family: Arial; font-size: medium; line-height: normal;"><span style="color: rgb(0, 0, 0); font-family: Arial; font-size: medium; line-height: normal;">3. This device doesn't support high voltage receiver, the power supply of your receiver must be 4.8V to 6V.</span></p><p><span style="color: rgb(0, 0, 0); font-family: Arial; font-size: medium; line-height: normal;"><br></span><br></p>
<div style="font: 12px/21px Verdana, Arial, sans-serif; color: rgb(0, 0, 0); text-transform: none; text-indent: 0px; letter-spacing: normal; word-spacing: 0px; white-space: normal; orphans: 2; widows: 2; font-size-adjust: none; font-stretch: normal; background-color: rgb(255, 255, 255); -webkit-text-size-adjust: auto; -webkit-text-stroke-width: 0px;">
<strong style="font-size: 12px;">NOTE:</strong></div>
<ul style="font: 12px/21px Verdana, Arial, sans-serif; color: rgb(0, 0, 0); text-transform: none; text-indent: 0px; letter-spacing: normal; word-spacing: 0px; white-space: normal; orphans: 2; widows: 2; font-size-adjust: none; font-stretch: normal; background-color: rgb(255, 255, 255); -webkit-text-size-adjust: auto; -webkit-text-stroke-width: 0px;">
<li>
<font face="Arial" size="3">The output extension wire not include. Depend on different output device, you need choice specification wire and weld by your self. Example (check pictures below).</font></li>
<li>
<span style="font: 13px/17px "lucida grande", tahoma, verdana, arial, sans-serif; color: rgb(255, 0, 0); text-transform: none; text-indent: 0px; letter-spacing: normal; word-spacing: 0px; float: none; display: inline !important; white-space: normal; orphans: 2; widows: 2; font-size-adjust: none; font-stretch: normal; background-color: rgb(255, 255, 255); -webkit-text-size-adjust: auto; -webkit-text-stroke-width: 0px;"><font face="Arial" size="3">BEFORE you use this module,pleas set the HDMI output mode on your camera to "Auto",or the module won't work!!</font></span></li>
</ul>
</div>
</div>
<p>
</p>
This is a preview of the recently viewed products by the user.
Once the user has seen at least one product this snippet will be visible.
Once the user has seen at least one product this snippet will be visible.
Recently viewed Products

To install this Web App in your iPhone/iPad press ![]() and then Add to Home Screen.
and then Add to Home Screen.

